【無料DL可】X(旧Twitter)予約投稿ツールの利用方法【画像複数投稿可能】
sanane SANANEBLOG
Do you find it difficult to manage respondents when using Google Forms?
Especially when running large-scale events, surveys, or tests, you can see who has responded, but tracking who hasn’t is a real challenge.
In this article, we’ll show you how to automatically generate a list of non-respondents using Google Apps Script (GAS), Google Forms, and Google Sheets.

You can build this tool in about 10 to 15 minutes.

Let me briefly explain how this tool works.
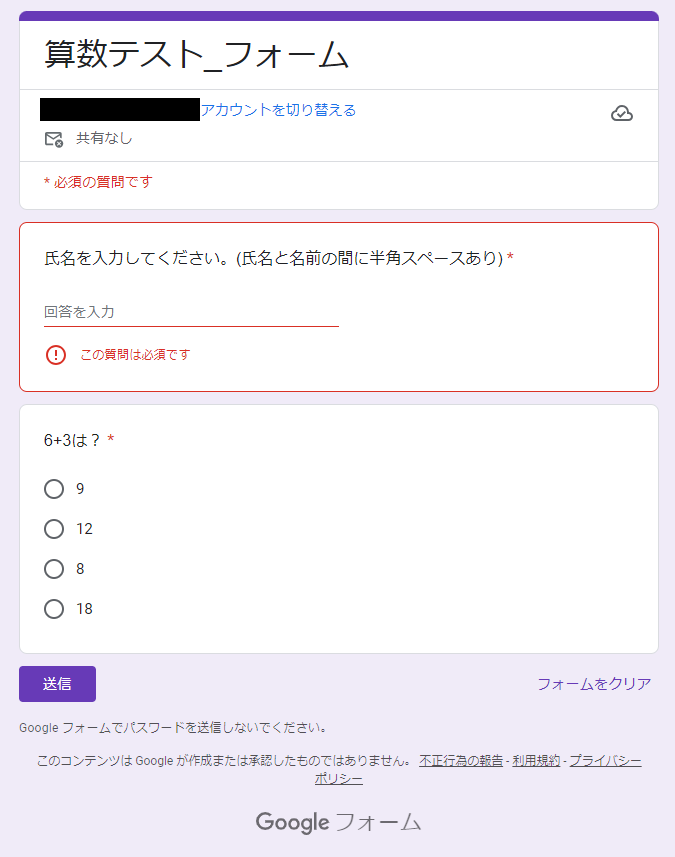
As a sample, prepare a form like the one below.
Create a question that asks respondents to enter their name.
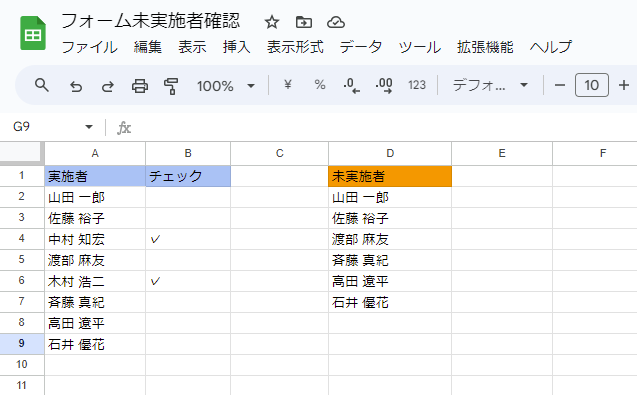
Also, prepare a spreadsheet like the one below. List all expected respondents’ names in column A starting from cell A2.

When a form is submitted, GAS automatically checks whether the name entered in the form matches a name in the roster column. If it matches, a checkmark “✓” is placed in the cell next to the matching name.
At the same time, a list of non-respondents is generated in column D.
You will need the following to set up this automation:
First, go to Google Sheets.
Click Blank spreadsheet under “Start a new spreadsheet” to create a new spreadsheet.
Also, make a note of the following parameter as you will need it later.
Copy the ID from the address bar of your spreadsheet.
The part to copy is shown as “COPY_THIS_VALUE” below.
https://docs.google.com/spreadsheets/d/COPY_THIS_VALUE/edit#gid=0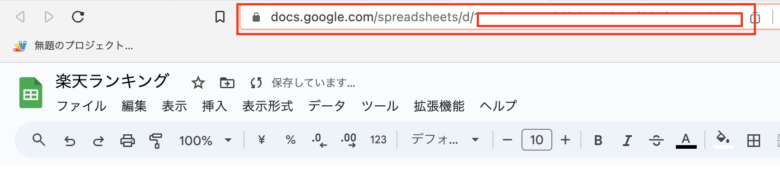
Next, create a table like the one shown below. Add headers in the first row, then list all expected respondents’ names in column A starting from cell A2.
Go to Google Forms.
Select an existing form or create a new one, then add a question that asks respondents to enter their name.
Once the form is ready, click the three-dot menu “⋮” in the upper right corner of the form, then click “Script editor”.
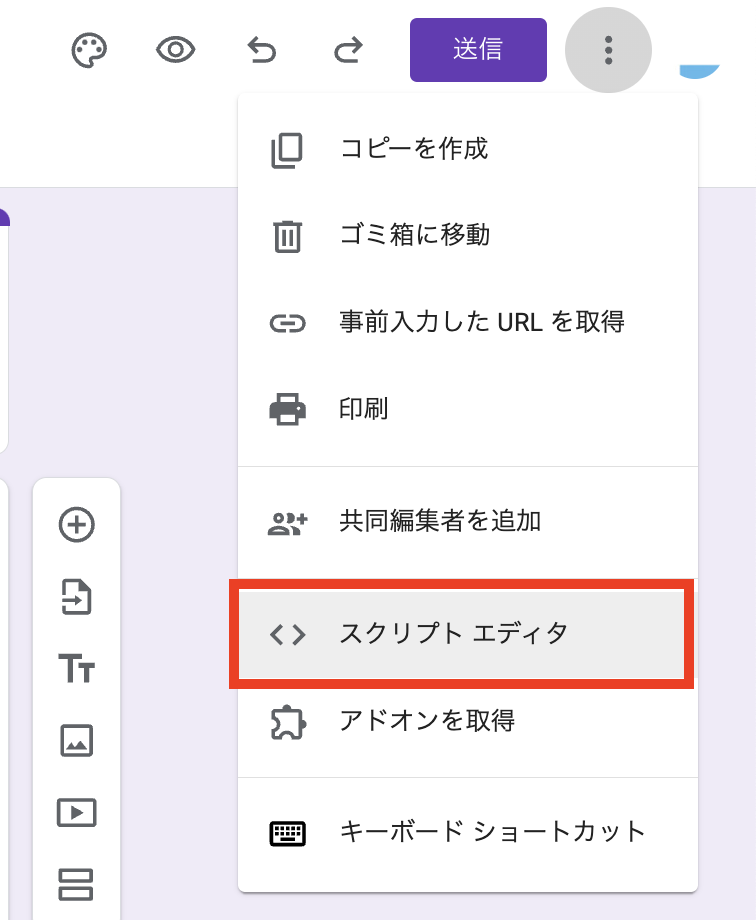
Clicking “Script editor” opens the Apps Script editor.
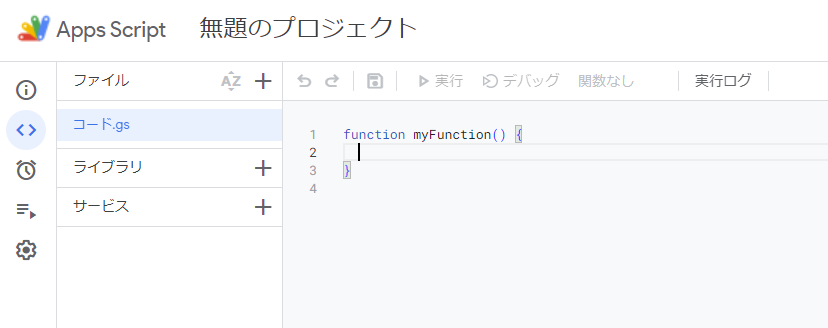
Now you will write the code in Apps Script. First, delete the default code shown below:
function myFunction() {
}
After deleting it, copy and paste the following code.
Replace the value in single quotes on line 3 as described below:
YOUR_SPREADSHEET_ID: The spreadsheet ID you noted in the previous step
function onFormSubmit(e) {
  // Specify the spreadsheet ID
  var SPREADSHEET_ID = 'YOUR_SPREADSHEET_ID';  // Replace this string with your actual ID
  // Open the spreadsheet
  var ss = SpreadsheetApp.openById(SPREADSHEET_ID);
  var sheet = ss.getActiveSheet();
  // Get the form response
  var formResponse = e.response;
  var itemResponses = formResponse.getItemResponses();
  var firstAnswer = itemResponses[0].getResponse();
  // Get the roster from cell A2 and search for a matching name
  var names = sheet.getRange('A2:A' + sheet.getLastRow()).getValues();
  var statuses = sheet.getRange('B2:B' + sheet.getLastRow()).getValues();
  // Create a list of non-respondents
  var uncompleted = [];
  for (var i = 0; i < names.length; i++) {
    if (names[i][0] == firstAnswer) {
      statuses[i][0] = '✓';
    }
    if (!statuses[i][0] || statuses[i][0] !== '✓') {
      uncompleted.push([names[i][0]]);
    }
  }
  // Update the status in column B
  sheet.getRange('B2:B' + sheet.getLastRow()).setValues(statuses);
  // Clear column D from D2 onward
  sheet.getRange('D2:D' + sheet.getLastRow()).clearContent();
  // Write non-respondents in column D
  if (uncompleted.length > 0) {
    sheet.getRange('D2:D' + (1 + uncompleted.length)).setValues(uncompleted);
  }
}Once you have entered the spreadsheet ID, press Ctrl+S or click “Save project” in the Apps Script toolbar to save your script.
Next, create a trigger that will run the script automatically.
In the left sidebar of the Apps Script editor, click “Triggers” (the clock icon).
Click “+ Add Trigger” at the bottom of the screen.
Set the function to onFormSubmit, the event source to From form, and the event type to On form submit.
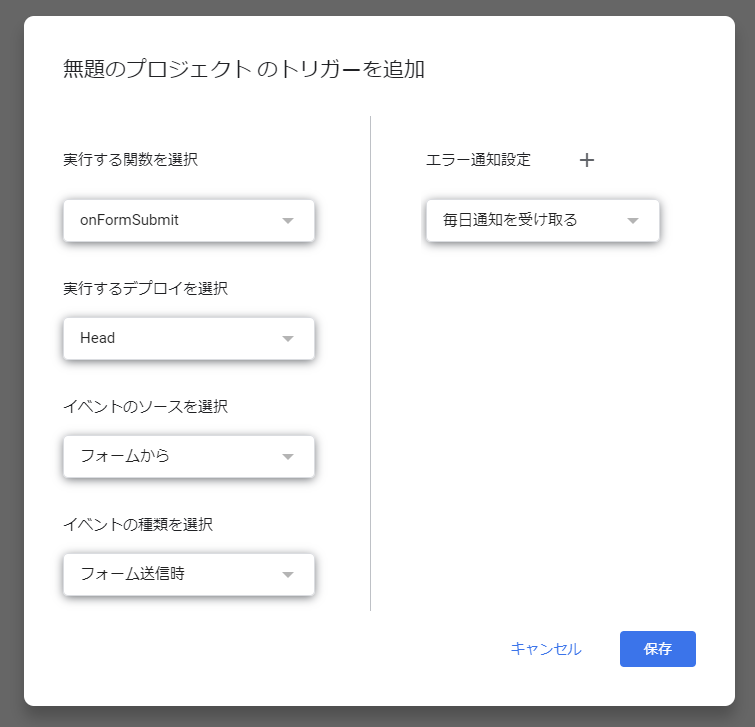
Finally, click “Save”.
Running the function for the first time requires authorization. When the “Authorization required” dialog appears:
Click “Review permissions” > Select your Google account > Click “Advanced” > Click “Go to Untitled project (unsafe)” > Click “Allow”.
After clicking “Allow”, the trigger will be created.
The setup is now complete. Send the Google Form to your respondents using the “Send” button. As responses come in, the spreadsheet will automatically update in real time with the response status.