【2025年3月】X(旧Twitter)FreeプランのAPIキー取得方法

はじめに
本記事では、X(旧Twitter)のBot作成や自動ツイートなどを行うために必要な、APIキーの取得方法について解説します。

Twitter API キーとは?
Twitter API キーとは、TwitterのAPIにアクセスするために必要な認証情報です。
これには、 以下の4つの要素が含まれています。
- API Key
- API Secret Key
- Access Token
- Access Token Secret
これらのキーとトークンは、Twitterのデータにプログラムでアクセスする際に、アプリケーションがTwitterに対して自身を識別するために使用されます。
APIキー作成方法
Twitter Developer Portalにログイン
まず、Twitter Developer Portalにログインします。
アクセス後は右上の[Developer Portal](または開発者ポータル)をクリックします。
Sign up for Free Accountをクリック
ログイン後の画面では画面一番下の[Sign up for Free Account]をクリックします。

Developer agreement&policyを入力
Developer agreement&policyでは、TwitterのデータやAPIを利用したユースケースを記述する必要があります。
ですが今回の場合は記述した内容が審査されることはありませんので、以下の文をコピーして貼り付けるだけで問題ありません。
I intend to utilize the Twitter API to create an automated bot for my Twitter account. The primary purpose of this bot is to schedule and post beneficial content for other users at specific times daily. By leveraging the vast data available on Twitter and the capabilities of the Twitter API, the bot will curate and disseminate valuable information, insights, or updates that cater to the interests and needs of my followers. This automation will not only ensure consistent engagement with my audience but also significantly enhance the efficiency of my daily operations. By automating this aspect of my social media strategy, I can allocate more time to other critical tasks while maintaining a robust online presence. Through this endeavor, I aim to strike a balance between providing value to my followers and optimizing my workflow.(訳)Twitter APIを利用して、私のTwitterアカウント用の自動ボットを作成するつもりです。このボットの主な目的は、毎日特定の時間に他のユーザーにとって有益なコンテンツをスケジュールして投稿することです。Twitterで利用可能な膨大なデータとTwitter APIの機能を活用することで、このボットは私のフォロワーの興味やニーズに応える価値ある情報、洞察、または最新情報をキュレートして発信します。この自動化は、私のオーディエンスとの一貫したエンゲージメントを保証するだけでなく、私の日常業務の効率を大幅に向上させます。ソーシャルメディア戦略のこの側面を自動化することで、私はオンラインプレゼンスを強固に維持しながら、より多くの時間を他の重要なタスクに割り当てることができる。この取り組みを通じて、私はフォロワーへの価値提供とワークフローの最適化のバランスを取ることを目指しています。
他3箇所のチェックボックスにチェックを入れた後、[Submit]をクリックします。

自動でTwitter Developer Portalのダッシュボード画面に移動します。
APIキーの発行
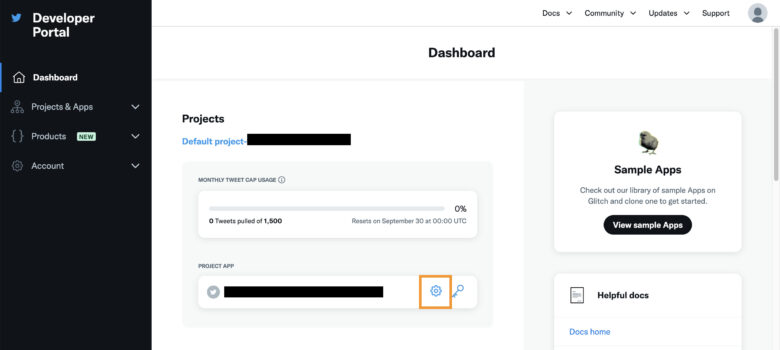
APIキーの発行のため、画面下部の[PROJECT APP]内の歯車マークをクリックします。

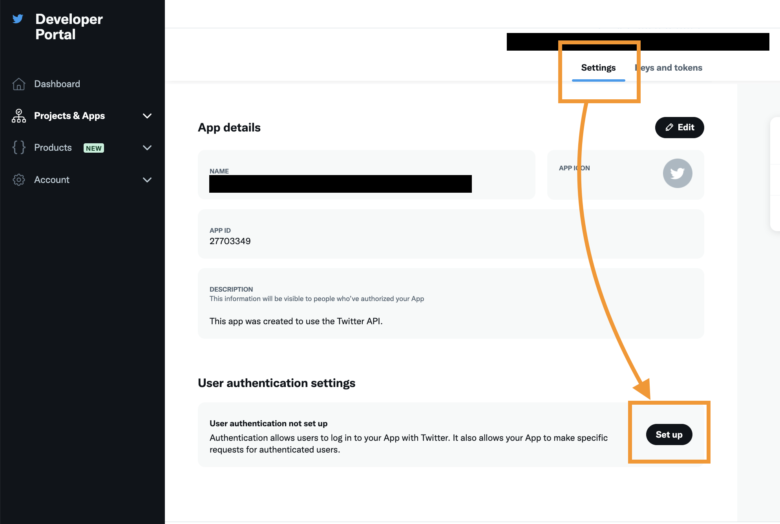
[Settings]タブより、[User authentication settings]の[Set up]をクリックします。

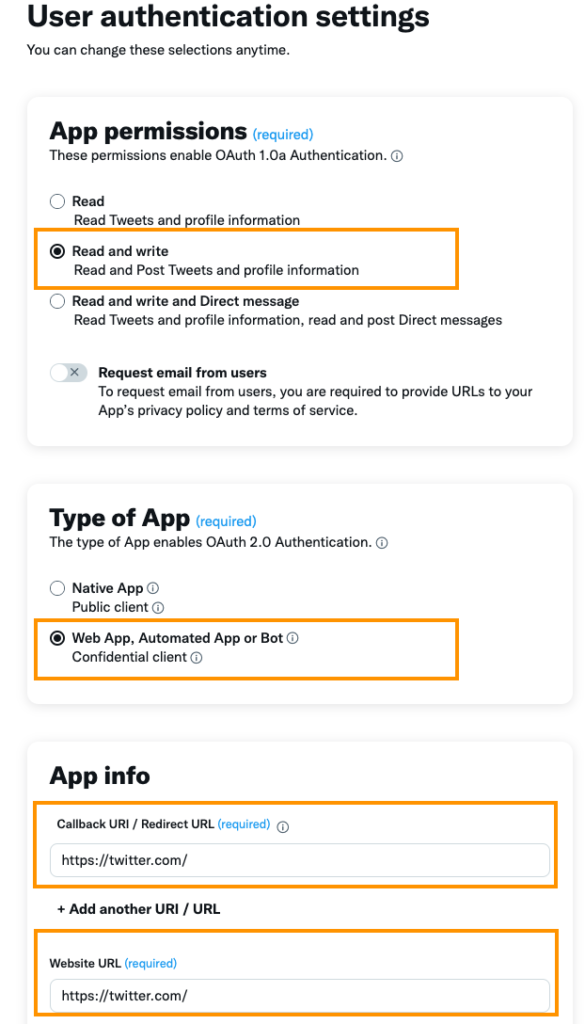
以下は基本的な設定の例となります。使用したい機能や方法により設定内容は異なるため注意してください。
入力後[Save]をクリックすると完了です。

その後、[Client ID]と[Client Secret]が発行されます。この内容はコピーして控えておき、[Done]をクリックして完了となります。


